Docker Homelab with Tailscale HTTPS and NFS Storage
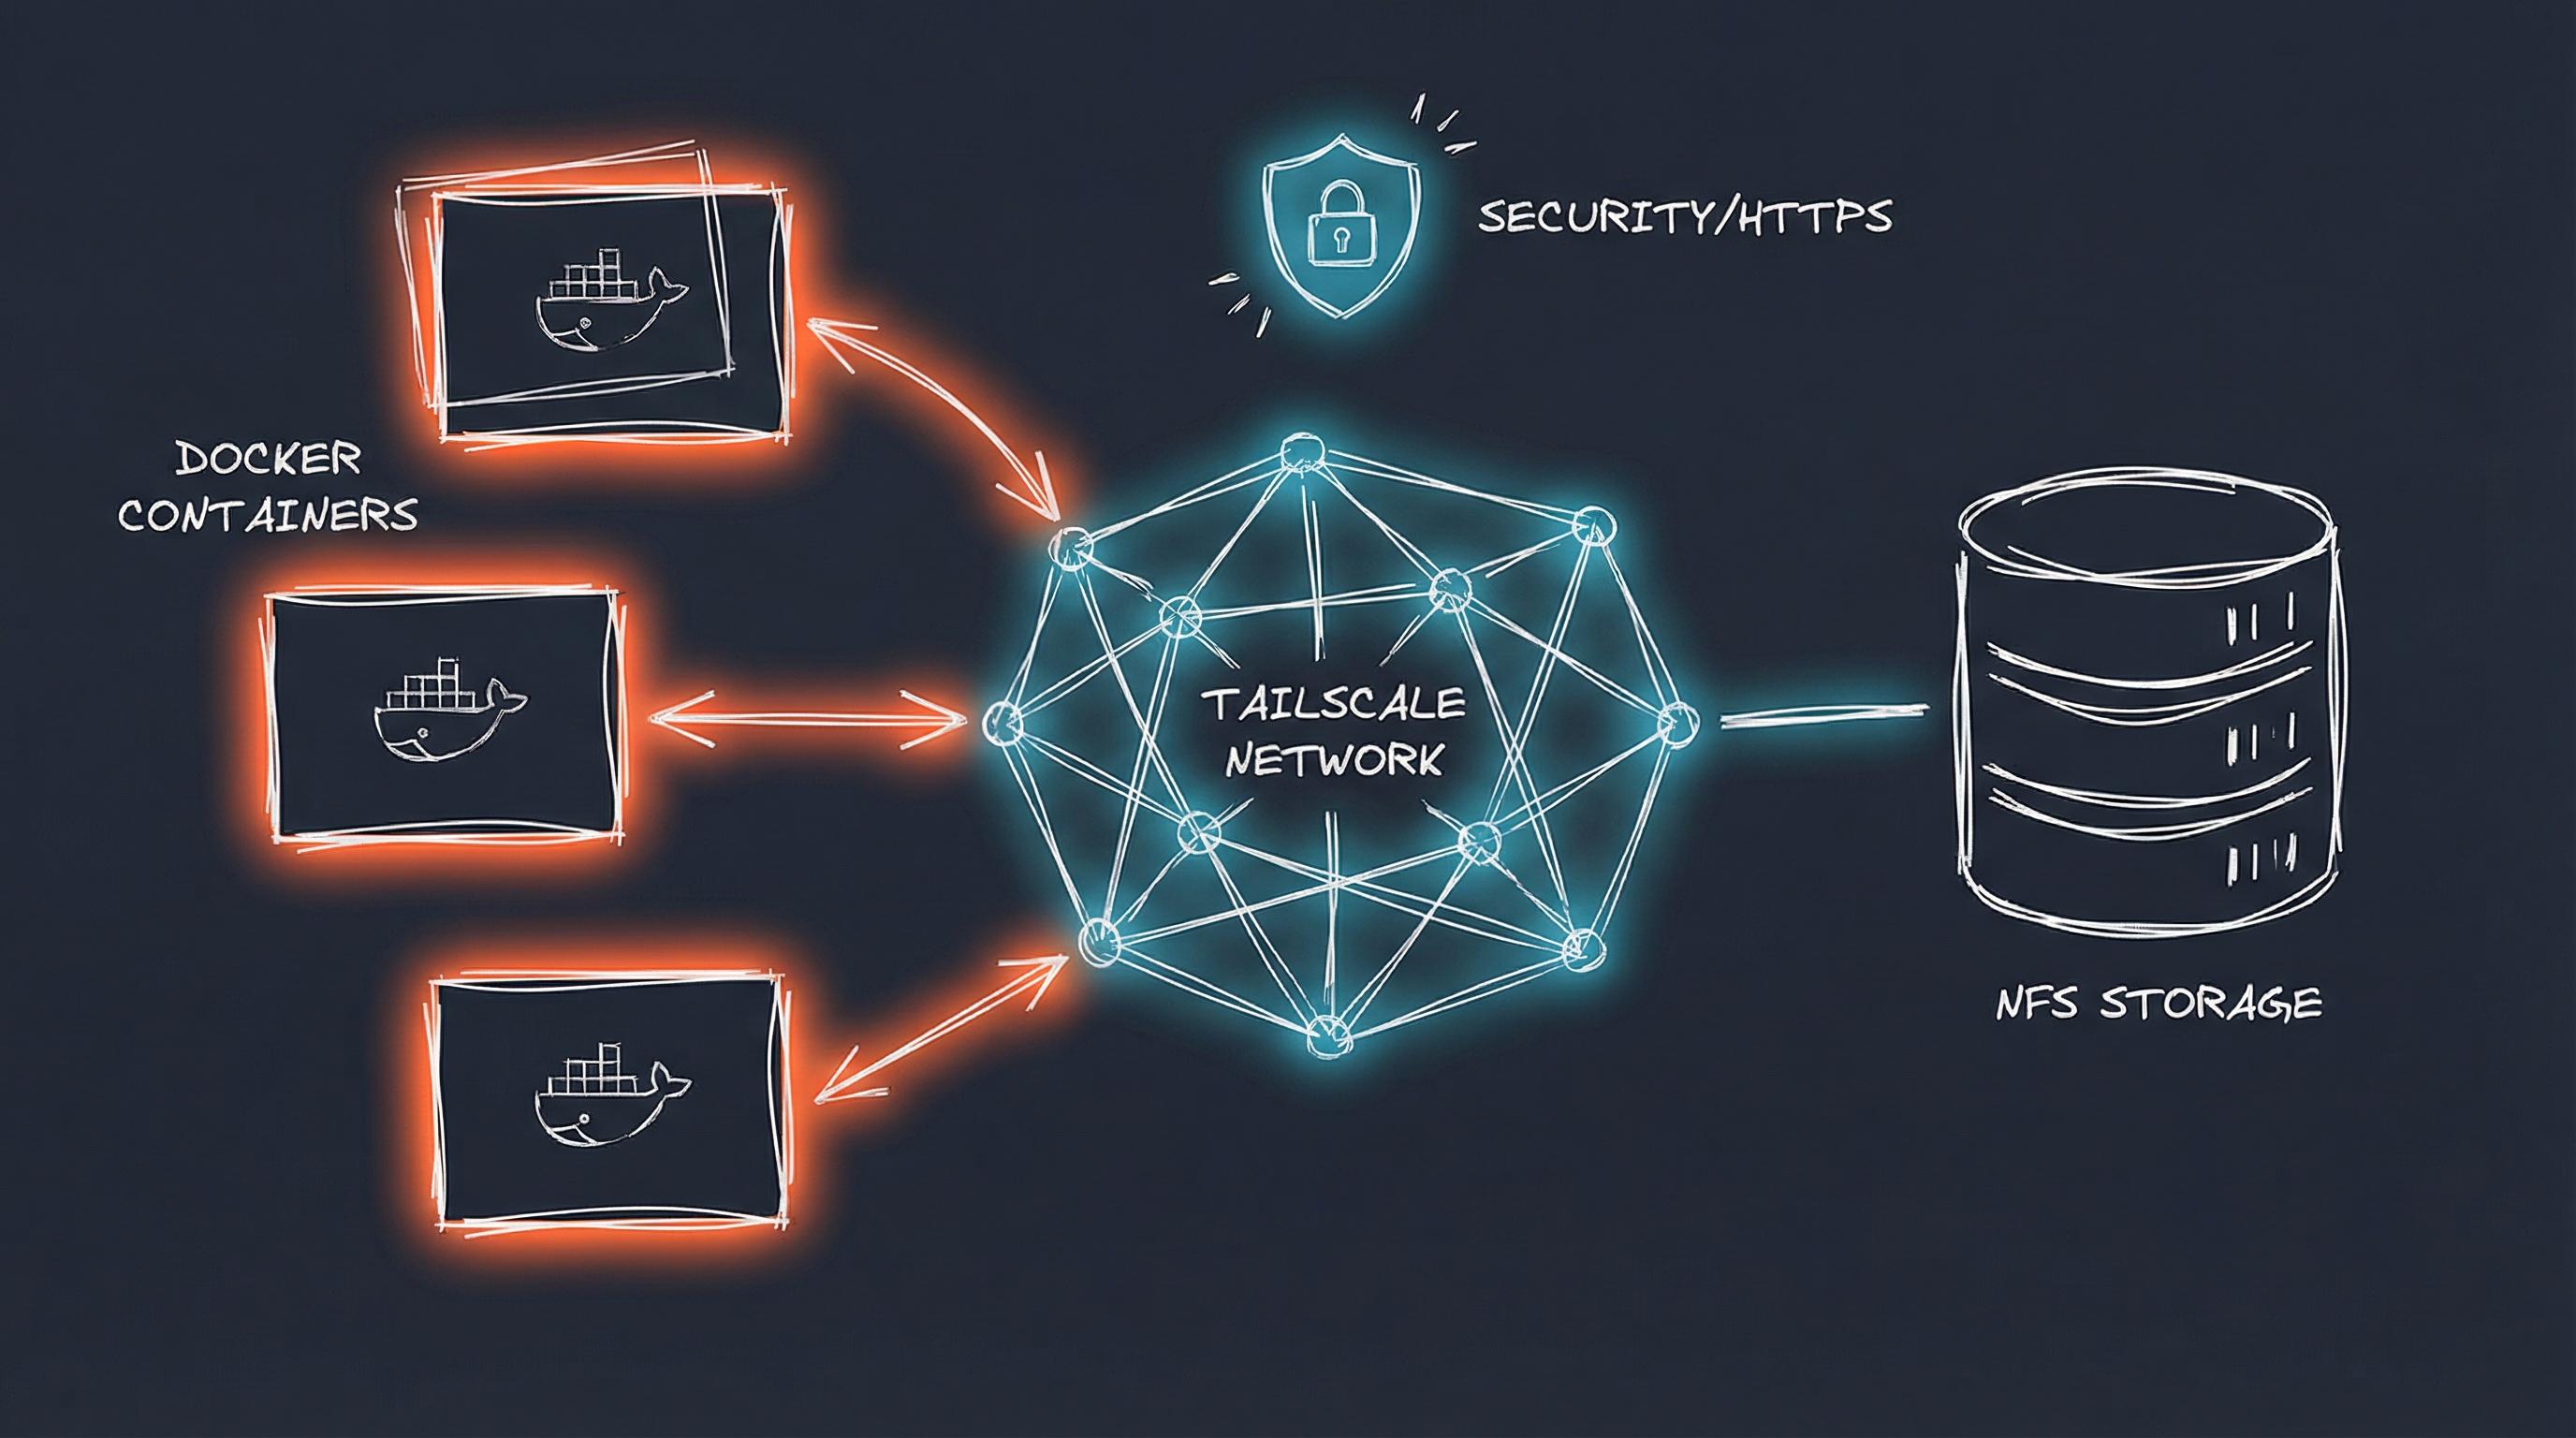
After a year of running 40+ containerized services in my homelab, I’ve settled on a stack that works for me: Docker on Ubuntu, Tailscale for HTTPS, NFS storage on Synology, and Portainer for GitOps deployment. This post covers the architecture, patterns, and lessons learned.
Why This Stack?
I wanted a homelab that was:
- Easy to use - HTTPS everywhere without port forwarding or reverse proxy
- Easy to restore - All data on NAS with automatic backups
- Low maintenance - Deploy via Git, update automatically
- Reliable - Patterns that work consistently at scale
The setup takes effort to understand initially, but once it’s working, I can deploy a new service in 10 minutes and restore from disaster in under an hour.
The Architecture
Infrastructure:
- Docker Host: Ubuntu 24.04 LTS on Proxmox
- Storage: Synology NAS with NFS mounts
- HTTPS: Tailscale with automatic certificates
- Deployment: Portainer pulling from private Git repo
- Updates: Renovate Bot + AI workflow for automated dependency updates (More on this in another post)
Core Design Principles:
- Tailscale sidecars - Every web app gets HTTPS via Tailscale container
- NFS for everything - All persistent data lives on the NAS
- GitOps deployment - Configs in Git, secrets in Portainer
- Custom address pools - 512 networks vs 31 default, prevents subnet exhaustion
I created a public templates repo with the basic patterns, but this post goes deeper into the actual implementation and troubleshooting.
Pattern 1: Tailscale HTTPS Sidecar
This is the foundation of the entire stack. Every web application uses a Tailscale container as the network base, with the app sharing its network namespace.
The Standard Pattern
services:
  app-tailscale:
    image: tailscale/tailscale:latest
    container_name: app-tailscale
    # BASE container - starts first, no network_mode, no depends_on
    command: sh -c "tailscaled & sleep 5 && tailscale up --authkey=$$TS_AUTHKEY --hostname=app --advertise-tags=tag:container --accept-dns=false && tailscale serve --bg --https=443 --set-path=/ 8080 && sleep infinity"
    environment:
      - TS_AUTHKEY=${TS_AUTHKEY}
      - TS_STATE_DIR=/var/lib/tailscale
    volumes:
      - /dev/net/tun:/dev/net/tun
      - /mnt/synology/docker-data/app/tailscale:/var/lib/tailscale
    cap_add:
      - NET_ADMIN
      - SYS_MODULE
    restart: unless-stopped

  app:
    image: myapp:latest
    container_name: app
    environment:
      - PUID=1000
      - PGID=1000
      - TZ=America/Chicago
    volumes:
      - /mnt/synology/docker-data/app/config:/config
      - /mnt/synology/docker-data/app/resolv.conf:/etc/resolv.conf:ro
    network_mode: service:app-tailscale
    depends_on:
      - app-tailscale
    labels:
      - "com.centurylinklabs.watchtower.enable=false"  # Disabled for network_mode
      - "diun.enable=true"
    restart: unless-stopped
The Tailscale container is the BASE:
- It starts first (no
network_mode, nodepends_on) - Creates the network namespace
- Handles HTTPS termination and certificate management
- App joins its network with
network_mode: service:app-tailscale
Benefits:
- App gets automatic HTTPS at
https://app.your-tailnet.ts.net - No port forwarding, no reverse proxy configuration
- App and Tailscale communicate via localhost
- Works from anywhere with Tailscale access
Lessons Learned
1. Always use kernel mode Tailscale
You need /dev/net/tun, NET_ADMIN, and SYS_MODULE capabilities. Userspace networking doesn’t work reliably in containers.
2. The resolv.conf mount is essential
Containers using network_mode: service:tailscale need proper DNS resolution:
# Create once per app
echo 'nameserver 127.0.0.11' > /mnt/synology/docker-data/app/resolv.conf
Mount it read-only: /mnt/synology/docker-data/app/resolv.conf:/etc/resolv.conf:ro
This points to Docker’s internal DNS (127.0.0.11), which has access to Tailscale MagicDNS.
3. Choose your base container carefully
If your app needs to communicate with other Tailscale services (OIDC providers, webhooks, APIs), Tailscale must be the base. If it’s standalone, the app can be the base.
4. Restart Tailscale container after deployment
Tailscale containers don’t automatically discover all peers at startup. After deploying, restart the Tailscale container to refresh peer discovery:
docker restart app-tailscale
docker restart app
Pattern 2: App with Database
When you need a database, it shares the app’s network namespace.
services:
  database:
    image: mariadb:latest
    container_name: app-db
    environment:
      - MYSQL_ROOT_PASSWORD=${MYSQL_ROOT_PASSWORD}
      - MYSQL_DATABASE=appdb
      - MYSQL_USER=${DB_USER}
      - MYSQL_PASSWORD=${DB_PASSWORD}
    volumes:
      - /mnt/synology/docker-data/app/db:/var/lib/mysql
    healthcheck:
      test: ["CMD", "mysqladmin", "ping", "-h", "localhost"]
      interval: 5s
      timeout: 3s
      retries: 10
    restart: unless-stopped

  app-tailscale:
    # ... Tailscale config from above

  app:
    image: myapp:latest
    environment:
      - SPRING_DATASOURCE_URL=jdbc:mariadb://database:3306/appdb
      - SPRING_DATASOURCE_USERNAME=${DB_USER}
      - SPRING_DATASOURCE_PASSWORD=${DB_PASSWORD}
    network_mode: service:app-tailscale
    depends_on:
      app-tailscale:
        condition: service_started
      database:
        condition: service_healthy
    restart: unless-stopped
Key points:
- Database has its own network (not sharing Tailscale’s)
- App connects via
database:3306(Docker DNS) - Health checks prevent app from starting before database is ready
- Use framework-specific env vars (Spring Boot, Django, etc.)
Pattern 3: NFS Storage
All persistent data lives on the Synology NAS, mounted via NFS on the Docker host.
NFS mounts (/etc/fstab):
192.168.1.x:/volume1/docker-data  /mnt/synology/docker-data  nfs  defaults,nofail,x-systemd.automount  0  0
192.168.1.x:/volume1/docker-media /mnt/synology/docker-media nfs  defaults,nofail,x-systemd.automount  0  0
Directory structure:
/mnt/synology/docker-data/     # Application configs (backed up)
/mnt/synology/docker-media/    # Media files (not backed up)
/mnt/synology/docker-backups/  # Database backups
Why NFS Over Docker Volumes?
Centralized backups:
- Synology Hyper Backup handles all application data
- Single point of backup configuration
- Easy to restore individual apps
Easy migration:
- Moving containers between hosts is trivial
- Just mount NFS and deploy stack
- No need to migrate Docker volumes
Shared media libraries:
- Multiple apps (Jellyfin, Audiobookshelf, Plex) access same media
- Single source of truth for media files
Permission Management
Critical: Pre-create directories with correct ownership
Docker won’t create NFS directories automatically. You must create them with proper permissions:
# For LinuxServer.io images (PUID/PGID 1000)
mkdir -p /mnt/synology/docker-data/app/config
chown -R 1000:1000 /mnt/synology/docker-data/app

# For official postgres image
chown -R 999:999 /mnt/synology/docker-data/app/db

# For official postgres alpine image
chown -R 70:70 /mnt/synology/docker-data/app/db
Match container UIDs:
- LinuxServer.io images: 1000:1000
- Official postgres: 999:999
- Official postgres alpine: 70:70
- Official redis: 999:999
Pattern 4: Portainer GitOps Deployment
I never run docker compose up manually anymore. Everything deploys via Portainer pulling from Git.
Workflow:
- Write
docker-compose.ymllocally - Test with
docker compose up -d - Commit to private Git repo (configs only, no
.env) - Deploy stack in Portainer:
- Stacks → Add Stack → Git Repository
- Repository:
https://github.com/mrkoller/homelab-docker-templates - Compose path:
stacks/appname/docker-compose.yml - Environment variables: Add in Portainer UI
- Portainer pulls and deploys automatically
Benefits:
- Configs versioned in Git
- Secrets never committed
- Easy rollback to previous versions
- Multiple stacks from single repo
Custom Address Pools
Docker’s default configuration allows only 31 networks before running into subnet conflicts. With 40+ services, this isn’t enough.
Configure custom address pools in /etc/docker/daemon.json:
{
  "default-address-pools": [
    {"base": "10.10.0.0/16", "size": 24},
    {"base": "10.20.0.0/16", "size": 24}
  ]
}
After adding, restart Docker:
sudo systemctl restart docker
This provides:
- 512 possible networks (vs 31 default)
- Two separate /16 address spaces
- Prevents subnet exhaustion as you scale
Real-World Troubleshooting
OIDC Integration Failures
Problem: Apps connecting to Authentik or other OIDC providers fail with DNS errors.
Symptoms:
NameResolutionError
Failed to resolve authentik.your-tailnet.ts.net
[Errno -3] Try again
Solution: The resolv.conf must use Docker DNS (127.0.0.11), not Tailscale DNS directly:
echo 'nameserver 127.0.0.11' > /mnt/synology/docker-data/app/resolv.conf
docker restart app
Why: Containers using network_mode: service:tailscale share the Tailscale container’s network namespace. Docker’s internal DNS has access to Tailscale MagicDNS, but direct Tailscale DNS (100.100.100.100) doesn’t work from within the shared namespace.
Connection Timeouts to Other Tailscale Services
Problem: App can resolve Tailscale hostnames but can’t connect.
Solution: Restart Tailscale container to refresh peer discovery:
docker restart app-tailscale
docker restart app

# Verify connectivity
docker exec app-tailscale ping -c 3 authentik.your-tailnet.ts.net
Why: Tailscale containers don’t discover all peers immediately at startup. A restart forces peer list refresh.
Port Mismatches
Problem: Tailscale serve command points to wrong port, app unreachable.
Solution: Always verify app’s actual listening port from logs:
docker logs app 2>&1 | grep -i "listening\|started\|port"
Network Mode Variations
Not everything fits the Tailscale sidecar pattern. Here are the alternatives:
Host Networking (for Layer 2 Access)
Use when: App needs ARP, nmap, or network device discovery.
Example: NetAlertX (network monitoring)
services:
  netalertx:
    image: jokobsk/netalertx:latest
    network_mode: host
    cap_add:
      - NET_ADMIN
      - NET_RAW
      - NET_BIND_SERVICE
    security_opt:
      - apparmor:unconfined
Access: Via Ubuntu host’s Tailscale connection + tailscale serve on host.
No Tailscale sidecar needed - uses host’s Tailscale.
Direct Port Exposure (for Game Servers)
Use when: Non-HTTP protocols or services incompatible with Tailscale proxy.
Example: Minecraft server
services:
  minecraft:
    image: itzg/minecraft-server:latest
    ports:
      - "25565:25565/tcp"
      - "25565:25565/udp"
Access: Direct via Docker host IP (192.168.1.x:25565).
No Tailscale needed - game protocols don’t work through HTTPS proxy.
Automated Updates
I run Renovate Bot with an AI workflow that analyzes update risk and auto-merges low-risk changes. This saves 2-4 hours per week.
Workflow:
- Renovate creates PR
- n8n workflow triggers
- OpenAI GPT-4o-mini analyzes:
- Semantic versioning
- Changelog content
- Breaking changes
- Low risk → Auto-merge
- High risk → Discord notification for manual review
- Portainer polls Git every 5 minutes, deploys merged changes
Cost: ~$1-2/month in OpenAI API costs. More on this in another post.
Getting Started
I created a public templates repo with:
- Basic app + Tailscale template
- App + database + Tailscale template
- Media server with NFS template
- Documentation for Tailscale and NFS setup
The templates use :latest tags for simplicity. In my homelab, I pin digest hashes via Renovate.
Prerequisites:
- Docker host (Ubuntu 24.04 recommended)
- NFS server (Synology, TrueNAS, etc.)
- Tailscale account
- Portainer (optional but highly recommended)
- Custom address pools configured (if running 30+ services)
Conclusion
This stack has been running for over a year with 40+ services. The patterns work reliably, deployments are fast, and maintenance is minimal.
Key takeaways:
- Tailscale sidecars eliminate reverse proxy complexity
- NFS storage centralizes backups and simplifies migrations
- GitOps via Portainer keeps configs versioned and deployable
- Custom address pools prevent subnet exhaustion at scale
- Automated updates save hours of manual maintenance
If you’re building a homelab and want solid patterns without Kubernetes complexity, this stack is worth considering.
AI Influence Level: AIL2
Resources: