Azure App Proxy Setup via Graph PowerShell
I got tasked with creating several Azure app proxy setups (I mean “Microsoft Entra Private Network Connectors”). So many applications that I was definitely not going to set them all up in the portal GUI. Graph PowerShell is usually my go to for Azure scripting, so I took to the documentation. I found that were are sections present of how to do things, but not a complete setup. So I decided to write a script that includes all the pieces together in hopes it helps someone.
The script will:
- Create an App Proxy Enterprise Application
- Configure the settings
- Add the app to an app proxy connector group
- Assign a user group to that application
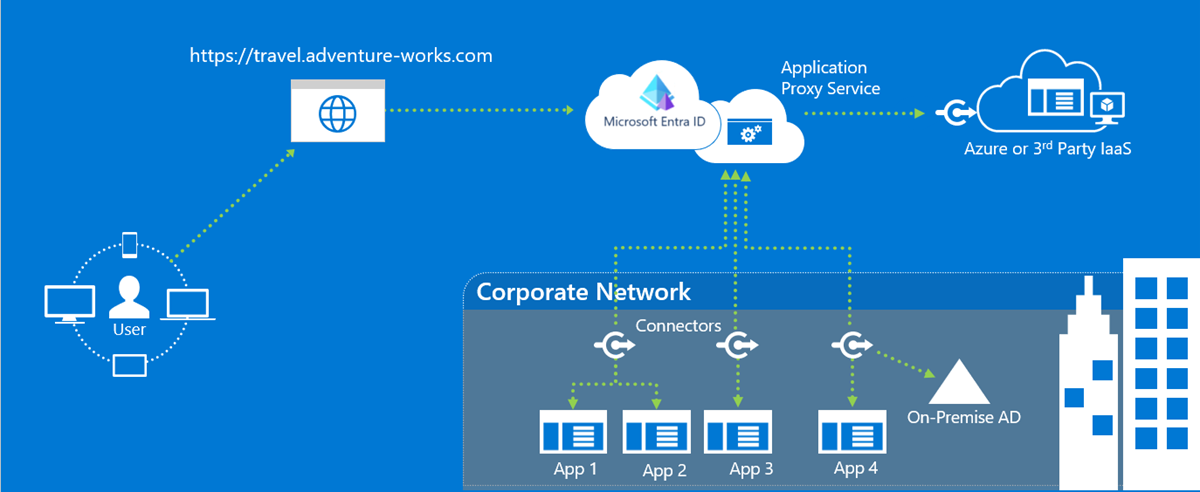
You can do a lot with these App Proxy setups but this is for a simple scenario. Here is a good walkthrough of the whole thing, and here are some more advanced features, but for a basic internal site or IP you need at least:
- Azure P1 or P2 subscription
- The Application Administrator Entra RBAC role.
- An internal DNS entry for your IP/website/asset.
- A connector that runs on an internal server and is added to a connector group.
- A user group that will be assigned to the app which controls who has access.
- An Azure Enterprise Application (the focus of this post).
Once those first 5 items are out of the way, you can add multiple apps to the same connector, but be aware that there are considerations depending on the site’s traffic.
The first thing you’ll want to do is get the connector group ID as that part is almost separate from all the other pieces in Azure. I took the code from this page in the docs.
You’ll need the following Graph PowerShell modules for everything in this post:
- Microsoft.Graph.Applications
- Microsoft.Graph.Beta.Applications
You run this code to get all the connector groups in your tenant. Then you’ll assign the ID of the connector group you want to use to assign the application we’ll be creating.
<#
Get the all connector groups details. Run this followed by "Get-AADAPConnectorGroupDetails" to get the Connector Group Ids if you do not know them already.

If you have not connected to Graph yet first install modules below, then run:
#>

# Import required modules
Import-Module Microsoft.Graph.Applications
Import-Module Microsoft.Graph.Beta.Applications

# Connect to Graph (Need App Admin for this script)
Connect-MgGraph -Scope Directory.ReadWrite.All

function Get-AADAPConnectorGroupDetails {
$aadapConnectorGroups= Get-MgBetaOnPremisePublishingProfileConnectorGroup -OnPremisesPublishingProfileId "applicationProxy" -Top 100000

$countAssignedApps, $CountOfConnectorGroups = 0

foreach ($item in $aadapConnectorGroups) {

     If ($item.ConnectorGroupType -eq "applicationProxy") {

     Write-Host "Connector group: " $item.Name, "(Id:" $item.Id ")" -BackgroundColor "Black" -ForegroundColor "White"
     Write-Host "Region: " $item.Region

     Write-Host " "

     $connectors = Get-MgBetaOnPremisePublishingProfileConnectorGroupMember -ConnectorGroupId $item.Id -OnPremisesPublishingProfileId "applicationProxy"

     $connectors | Format-Table

     " ";

     $CountOfConnectorGroups = $CountOfConnectorGroups + 1

     }
}
}
We’ll want to supply two pieces of information to our main script now that we have the connector group ID:
- The App’s display name (no spaces - see below)
- The user group name that we’ll assign for access to the app.
You could do this a number of different ways, but to simplify things, I use the display name with no spaces that matches the internal DNS entry. This will automatically set to lower case for the URLs, but will honor case sensitivity for the display name in the portal if that is what you want.
The last thing to note is that there are several configuration options for the app’s connection. The internal IP here is http so we’re not enabling the verify https option for example. Change this for your app’s needs (check the portal’s advanced tab in the app’s app proxy blade).
Here is the whole thing, including the code above for the connector group id (commented out) if you just wanted to copy the whole thing for later use. Regular caveats apply, there is no error handling in this and you could easily add a foreach to loop through if you wanted to do more than one at a time. Be sure to also specify your domain name.
<#

    .SYNOPSIS
        This script will create an App Proxy Enterprise Application in Azure, configure the settings,
        add the app to an app proxy connector group, and assign a user group to that application.

    .DESCRIPTION
        The app proxy connector group is hard coded to a specific connector group id, but there is code below to get other group ids if needed.
        Users can be added to the user group before or after this process seperately.

    .REQUIREMENTS
        You need the Application Admin role in Azure to run this.
        You need to supply the two names in the "Define Required Variables" section below.

    .NOTES
        Not required to run this, but you should have an internal DNS entry created and you should use that as the AppDisplayName for ease of use.

    .LINK


    .AUTHOR
        Matt Koller

    .VERSION
        1.0

    .DATE
        03/01/24

#>

# Import required modules
Import-Module Microsoft.Graph.Applications
Import-Module Microsoft.Graph.Beta.Applications

# Connect to Graph (Need App Admin for this script)
Connect-MgGraph -Scope Directory.ReadWrite.All

# Define Required Variables
# AppDisplayname connot contain space, but can contain mixed case.
# AppDisplayName will also be the site name for the URL (automatically changed to lower case) so it should match the internal DNS entry.
# GroupName is the user group that will have access to the application.
$AppDisplayName = "<AppNameGoesHere>"
$GroupName = "<GroupNameGoesHere>"


# Other variables (no changes needed apart form the domain name once)
$SiteName = $AppDisplayName.toLower()
$ExternalURL = "https://$SiteName-<yourdomainhere>.msappproxy.net"
$internalUrl = "http://$SiteName.<yourdomainhere>.com"
$applicationTemplateId = "8adf8e6e-67b2-4cf2-a259-e3dc5476c621" #don't need to change this

# Get group's ObjectId
$Group = Get-MgBetaGroup -ConsistencyLevel eventual -Count userCount -Search DisplayName:$GroupName
$groupObjectId = $Group.Id

# Run the code commented out below to find the Connector Group Id and put the value here.
$ConnectorGroupId = "223144e0-3123-4123-9043-926b0645d123"

# Get the all connector groups details. Run this followed by "Get-AADAPConnectorGroupDetails" to get the Connector Group Ids if you do not know them already.
<#
function Get-AADAPConnectorGroupDetails {
    $aadapConnectorGroups= Get-MgBetaOnPremisePublishingProfileConnectorGroup -OnPremisesPublishingProfileId "applicationProxy" -Top 100000

$countAssignedApps, $CountOfConnectorGroups = 0

foreach ($item in $aadapConnectorGroups) {

     If ($item.ConnectorGroupType -eq "applicationProxy") {

     Write-Host "Connector group: " $item.Name, "(Id:" $item.Id ")" -BackgroundColor "Black" -ForegroundColor "White"
     Write-Host "Region: " $item.Region

     Write-Host " "

     $connectors = Get-MgBetaOnPremisePublishingProfileConnectorGroupMember -ConnectorGroupId $item.Id -OnPremisesPublishingProfileId "applicationProxy"

     $connectors | Format-Table

     " ";

     $CountOfConnectorGroups = $CountOfConnectorGroups + 1

     }
}
}
#>

# Create the enterprise application
$AppParams = @{
    displayName = "$AppDisplayName"
}

Invoke-MgInstantiateApplicationTemplate -ApplicationTemplateId $applicationTemplateId -BodyParameter $AppParams

# Wait for the app to be created and be available for below commands
Start-Sleep -Seconds 20

# Grab the app id of the new application we just created
$NewAppId = Get-MgApplication -Filter "DisplayName eq '$AppDisplayName'"

$applicationObjectId = $NewAppId.Id

# Define the basic details needed for the new app
$UrlParams = @{
    identifierUris = @(
        $ExternalURL
    )
    web = @{
        redirectUris = @(
            $ExternalURL
        )
        homePageUrl = $ExternalURL
    }
}

# Update the new app with the basic details
Update-MgBetaApplication -ApplicationId $applicationObjectId -BodyParameter $UrlParams

# Wait for the app to be updated and be available for below commands
Start-Sleep -Seconds 15

# Define the additional advanced details of the app
$AppSettingsParams = @{
    onPremisesPublishing = @{
        externalAuthenticationType = "aadPreAuthentication"
        internalUrl = $internalUrl.toLower()
        externalUrl = $ExternalURL.toLower()
        isHttpOnlyCookieEnabled = $false
        isOnPremPublishingEnabled = $true
        isPersistentCookieEnabled = $false
        isSecureCookieEnabled = $false
        isStateSessionEnabled = $false
        isTranslateHostHeaderEnabled = $true
        isTranslateLinksInBodyEnabled = $false
        isBackendCertificateValidationEnabled = $false
    }
}

# Update the app with the advanced details
Update-MgBetaApplication -ApplicationId $applicationObjectId -BodyParameter $AppSettingsParams

# Wait for items to update
Start-Sleep -Seconds 10

# Define the connector group info to update
$GroupConnectorParams = @{
    "@odata.id" = "https://graph.microsoft.com/beta/onPremisesPublishingProfiles/applicationproxy/connectorGroups/$ConnectorGroupId"
}

# Assign the app to the connector group
Set-MgBetaApplicationConnectorGroupByRef -ApplicationId $applicationObjectId -BodyParameter $GroupConnectorParams

# Get Enterprise Application service principal Id
$EntApplication = Get-MgBetaServicePrincipal -Filter "DisplayName eq '$AppDisplayName'"
$EntApplicationId = $EntApplication.Id

# Assign a group to the application (AppRoleId is "member" for user access)
New-MgBetaGroupAppRoleAssignment -GroupId $groupObjectId -PrincipalId $groupObjectId -ResourceId $EntApplicationId -AppRoleId "18d14569-c3bd-439b-9a66-3a2aee01d14f"
Check the portal and you should now have your app proxy fully configured!
AI Influence Level: AIL0 (no AI involvement)